For the English version, please scroll down.
პირის ღრუს ჰიგიენისთვის მნიშვნელოვანი როლი აქვს კბილის ძაფების გამოყენებას (flossing). ე.წ. ფლოსი ასუფთავებს და აშორებს კბილებს შორის ჩარჩენილ საკვებს და ამცირებს ბაქტერიების გავრცელებას პირის ღრუში.

აღსანიშნავია, რომ კბილების ყოველდღიურად გამოხეხვის მიუხედავად, ადამიანები ფლოსინგს თავიანთი პირის ღრუს მოვლის რუტინაში ნაკლებად ითვალისწინებენ. ამას მოწმობს არაერთი საერთაშორისო გამოკითხვა, რომლის მიხედვითაც დაახლოებით 10 ადამიანიდან 4 იხეხავს კბილებს დღეში 2-ჯერ, და მათგან მხოლოდ 20% იყენებს კბილის ძაფს ყოველდღიურად.
პირის ღრუს კარგ ჯანმრთელობისთვის აუცილებელია სწორად შევარჩიოთ ფლოსის გამოყენების დროც. ამასთან, უნდა აღინიშნოს ისიც, რომ კბილის ძაფის გამოყენებასაც თავისი ტექნიკა აქვს. კბილის ძაფის არასწორმა გამოყენებამ შეიძლება დააზიანოს კბილები და ავნოს ღრძილებს. ასე რომ, თუ არ ხარ დარწმუნებული თუ როგორ გაიწმინდო კბილებსშორისი სივრცეები, არ ინერვიულო, ჩვენ ეტაპობრივად გასწავლით ფლოსის გამოყენების სწორ ტექნიკას.
ფლოსინგის ინსტრუქცია
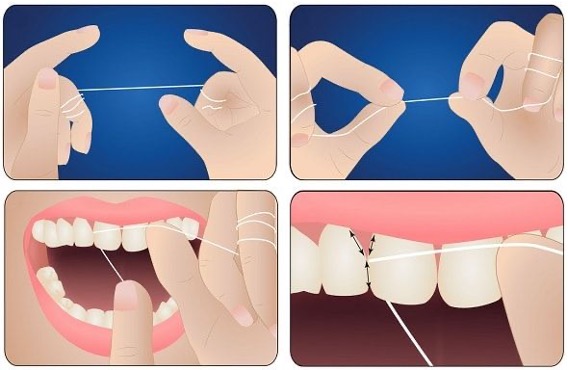
- დაგვჭირდება დაახლოებით 30 სმ სტომატოლოგიური ძაფი. მის სწორად დასაჭერად საჭიროა ძაფის ბოლოები დავიხვიოთ შუა თითებზე, სწორედ ისე, რომ ორივე მხრიდან შუა ნაწილში დაგვრჩეს 3-4 სმ სიგრძე.
- დავიჭიროთ კბილის ძაფი დაჭიმულ მდგომარეობაში საჩვენებელი და ცერა თითებით.
- მოვათავსოთ 2 კბილს შორის. ნაზად ჩავასრიალოთ ძაფი კბილის ზევით-ქვევით ჯერ ერთი კბილის საზღვარზე, ხოლო შემდეგ მცირედით ამოვწოთ და მეორე კბილის მხარეს მოვაქციოთ. აუცილებელია გავითვალისწინოთ, რომ ძაფი ძლიერად არ მოხვდეს ღრძილს, წინააღმდეგ შემთხვევაში ეს გამოიწვევს ღრძილის დაზიანებას.
- როდესაც ძაფი ღრძილში იქნება აუცილებელია მოვხაროთ კბილის ძირში, რათა შეიქმნას „C“ ფორმა. ეს საშუალებას მისცემს ძაფს კბილისა და ღრძილის მთელი ზედაპირი მოიცვას.
- გავიმეორეთ ეს ნაბიჯები კბილიდან კბილზე გადასვლისას. თითოეულ კბილთან ერთად გამოიყნეთ ძაფის ახალი, სუფთა ნაწილი.
ახლა თქვენ უკვე იცით კბილის ძაფის ე.წ. ფლოსინგის სწორი ტექნიკა, შესაბამისად არც მისი გამოყენება არ უნდა იყოს თქვენთვის რთული.
ნატა გოგრიჭიანი
ENGLISH VERSION
How to use dental floss correctly
Flossing plays an important role in oral hygiene. The so-called Floss cleans and removes food stuck between the teeth and reduces the spread of bacteria in the mouth.
It is worth noting that despite brushing their teeth daily, people rarely include flossing in their oral care routine. Several international surveys prove this, according to which about 4 out of 10 people brush their teeth 2 times a day, and only 20% of them use dental floss daily.
For good oral health, it is necessary to choose the right time to use the floss. However, it should also be noted that the use of dental floss also has its own technique. Flossing incorrectly can damage your teeth and gums. So, if you’re unsure how to clean the spaces between your teeth, don’t worry; we’ll teach you the proper flossing technique step-by-step.
Flossing instruction:
- We will need about 30 cm of dental floss. To hold it correctly, we need to wrap the ends of the thread on the middle fingers so that we have 3-4 cm in the middle on both sides.
2. Hold the dental floss tightly with the index and thumb fingers.
3. Place the floss between two teeth. Gently slide the floss up and down the tooth, first on the border of one tooth, and then pull it out a little and turn it to the side of the other tooth. It is necessary to ensure that the floss does not hit the gum hard; otherwise, it will damage the gum.
4. Once the floss is in the gum, it must be bent at the tooth’s base to create a “C” shape. This will allow the floss to cover the entire surface of the tooth and gum.
5. Repeat these steps, moving from tooth to tooth. Use a new, clean section of floss with each tooth.
Now, you already know the so-called dental floss. The correct flossing technique, therefore, should not be difficult for you to use either.
Nata Gogrichiani